
Retirement Living takes an unbiased approach to our reviews. We may earn money when you click a partner link. Learn More
How to Install a Stair Lift
DIY stair lift installation is possible, especially for a straight stair lift, but it requires precise measurements and standard power tools.

Updated:
At a glance:
- The process of installing a straight stair lift involves precise staircase measurements, securing the rail system to the stair treads, mounting the chair, connecting the battery, and testing the safety features.
- DIY installation might void your manufacturer’s warranty, so if you can afford professional installation ($500–$2,000), it’s often worth it.
- Wheelchair and curved stair lift installation may need to be performed by a professional installer due to complex measurements and regional safety regulations.
When you have pressing mobility needs, a new stair lift installation is a cost-effective way to improve your quality of life at home. Many homeowners wonder if it’s possible to DIY install certain stair lift options. It certainly is, given that they’re simple systems; however, it’s important to do so carefully and safely.
Below, we’ve outlined the installation process for stair lifts, covering the different types, step-by-step instructions, and when to consider professional assistance. Read on to learn more.
How Does Installing a New Stair Lift Work?
Unlike more heavy-duty home elevators, stair lifts don’t require any structural changes to your staircase or home layout. Instead, a measured and fitted rail system is fixed to the stair treads, which can then support a battery-powered lift chair. That way, seniors entering the chair from the bottom or top of the stairs are safely lifted and lowered to the floor of their choosing.
In total, there are three main components to worry about during the installation process: the track (rail), battery-powered chair, and chair controls.
The Importance of Stair Lift Type
Not every stair lift is the same. Lifts designed for straight staircases are the easiest to install, especially when you’re attempting DIY installation. Other types, such as curved stair lifts, chair lifts for wheelchair users, and outdoor stair lifts, are more likely to require professional installation.
- Straight stair lifts: Use standard rails cut to size during installation, making them the cheapest and easiest to install.
- Curved stair lifts: Demand custom-built rails that match the specific bends and angles of your curved or spiral staircase. This requirement makes the installation process significantly more complex.
- Wheelchair lifts: Though they’re often called chair lifts, these installations feature a flat platform rather than a seat. That way, users can remain in their wheelchair or scooter while being lifted. Professional installation is usually required to properly modify the surrounding structure to accommodate the added size and weight capacity.
- Outdoor stair lifts: Built with weather-resistant materials to withstand rain, temperature extremes, and UV exposure. While straight outdoor lifts aren’t too difficult to install, they must be mounted on surfaces that can withstand outdoor conditions, which adds complexity to the installation process.
Tools Needed For DIY Installation
Before you start the installation process, confirm that you have everything you need.
Stair Lift Components
- Rail sections
- Carriage/chair unit
- Drive mechanism (motor)
- Control panel and remote
- Safety sensors
- Mounting brackets and hardware
- Power supply cable
Installation Tools
- Drill and drill bits
- Screwdriver
- Wrench and socket set
- Level
- Measuring tape
- Stud finder
- Wire stripper and electrical tape
- Safety goggles and gloves
The Step-By-Step Stair Lift Installation Process
Your new stair lift should come with a manufacturer-provided instructional guide and owner’s manual to help you install it yourself. We recommend the exact steps outlined in the guide and manual, as every stair lift model is different, but you can also refer to the steps below:
1. Measure the Staircase
Before you can choose the best stair lift model, you’ll need to measure the length, width, and angle of your staircase. Straight stair lift rails can be cut to size, so be sure to get something longer than you need—standard rails extend about 18 inches at the top of the stairs. A stair lift with angles/curves or intermediate landings will need a custom curved rail.
2. Choose the Right Stair Lift
Choose the best stair lift model based on your staircase measurements. Also factor in weight capacity, seat comfort, and additional safety features. The devil is in the details here; for instance, outdoor installations need to be rated for exterior use, while curved staircases require a model with a custom curved rail. Look to verified stair lift reviews and trusted manufacturer advice for valuable tips.
3. Prepare the Staircase
If you’re having your stair lift delivered to your home, it can take anywhere from 3 days to several weeks to arrive. In the meantime, it’s important to clean up debris and clear any obstructions away from the staircase, including stair runners. Most stair lifts are battery-powered, so for power outage safety and remote control functionality, you’ll need a 120-volt AC household outlet near the staircase. If no outlet is within reach, an electrician will need to install one.
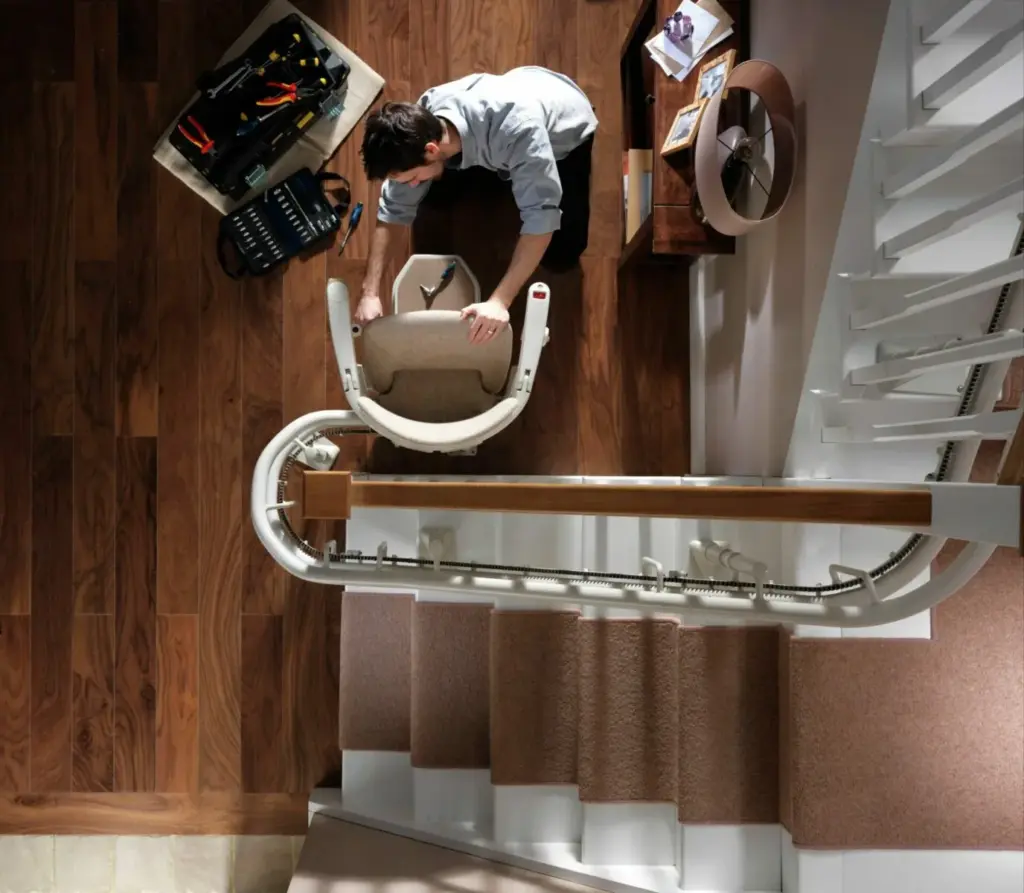
4. Install the Rail System
Once your new system arrives, you’ll need to cut the rail to the correct length based on your stair lift measurements. Next, the rail is fixed to the stair treads with brackets spaced evenly. Precise alignment is key for safe and smooth travel.
5. Mount the Stair Chair
Now that the rail is secure, you can attach the motorized chair to it. First, carefully align the motor carriage to the angle of the installed rail. You don’t need to force it down, as it should slide right into place. Next, you’ll likely secure the carriage to the rail by tightening bolts and fasteners to the specified torque, but you should always review the manufacturer’s instructions beforehand. Once the carriage is fixed, attach the seat, armrests, and footrest, making sure they all click or lock into place.
6. Connect the Battery
For the stair lift to operate, the battery pack must be connected in accordance with the manufacturer’s wiring diagram. Double-check that the charging contacts between the rail and carriage are properly aligned, as a poor connection can affect both performance and battery life. Most systems run on a battery that charges continuously through a nearby outlet, so once the connection is secure, the lift should have a constant power supply.
7. Test The System
After installation is complete, it’s important to test the lift before you use it. Vital tests include:
- Running the empty chair to the top of the staircase, listening for strange sounds or jerky movements.
- Trying the controls, such as the remote or wall switches.
- Verifying that the safety sensors stop the chair when an obstruction is detected.
- Testing the backup battery’s functionality.
If you notice any irregularities, consult the manufacturer’s manual or contact a professional before you start using the lift regularly.
When to Consider Professional Installation
Not every stair lift requires professional installation, but if you’re a senior with mobility issues or living alone, it’s often well worth the investment. A professional technician, usually assigned by the manufacturer of the model you purchased, arrives at your door with all the tools needed for proper installation. In some cases, such as curved stair lifts, wheelchair lifts, and certain outdoor models, professional installation is a must.
Generally speaking, it’s a good idea to discuss the best installation options with the stair lift manufacturer. That way, you can ensure that you get a functional system without voiding your warranty or risking unintended wear and tear.
Frequently Asked Questions (FAQs) About Installing a Stair Lift
The most important requirements for a stair lift installation are an adequate staircase (stable enough to support the rail and at least 28 inches wide) and a compatible power supply (a 120-volt electrical outlet). Another important consideration is leaving enough space to safely enter and exit the chair at the top and bottom of the steps, though some “zero intrusion” stair lift models are specially designed to address this issue.
Absolutely. Straight stair lifts are the easiest to install DIY because they have simple measurements with no curves, allowing you to cut a standard rail to size. On the other hand, curved models are far more complicated to measure for. Wheelchair lifts and outdoor lifts also have their own unique complications, including weight capacity considerations and weatherproofing.
Sometimes, if you have the applicable skills, but it’s generally not recommended. In the case of curved lifts, you’ll need to account for every turn with a custom-fitted rail. Wheelchair lifts can be straight or curved but feature a heavy-duty platform (rather than a chair), which requires careful weight-capacity considerations.
Yes, many companies, including Acorn, Stannah, Handicare, and Harmar, will void their equipment warranty if you choose DIY installation. If your warranty is important to you, carefully review the manufacturer’s warranty terms before you attempt the installation.
Stair lifts usually take between two and six hours to install, though DIY installations will likely take longer than the average professional installation.
Professional stair lift installation typically costs between $500 and $2,000 in addition to the equipment costs, depending on your staircase’s layout and complexity.
Help us improve our cost data! Email your latest stair lift quote to [email protected]. Rest assured, your personal details will remain completely confidential.